How to Change an Outfit in Product Photos
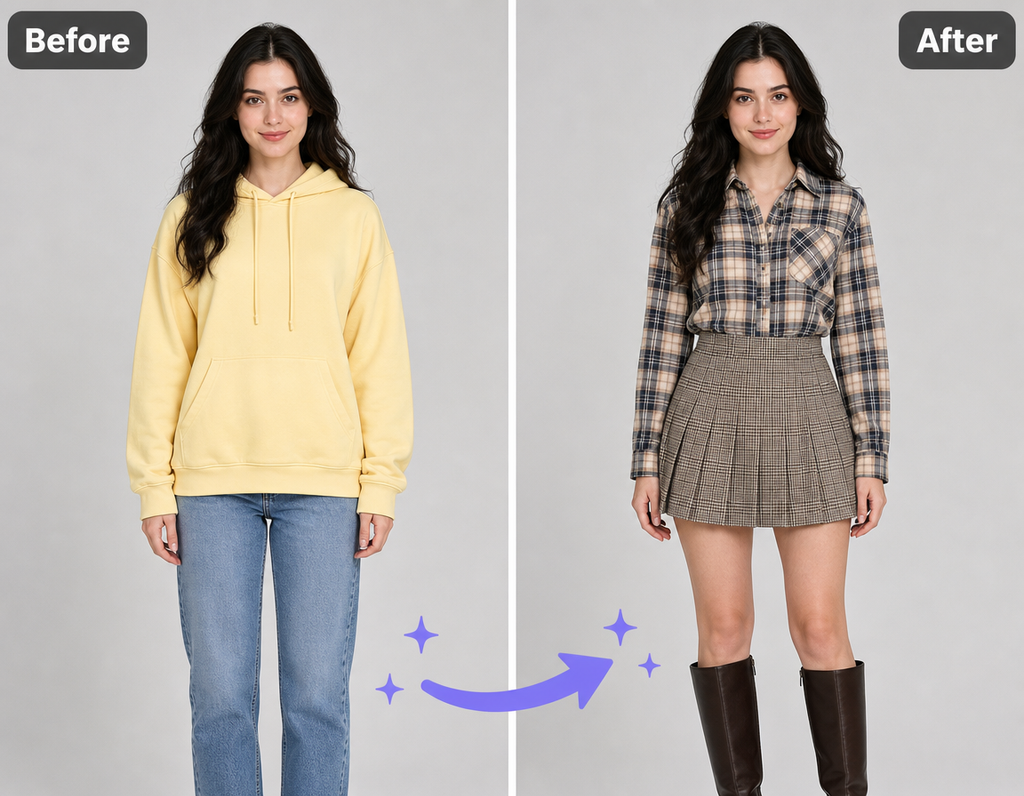
Changing a model’s outfit after a photo shoot can save hours of planning, styling, and studio costs. With the right image and an AI clothes editing tool, you can replace a shirt, dress, jacket, or other garment while keeping the model’s face, pose, lighting, and background intact.
I’ve found that the best results come from treating the process like a photo edit, not a magic trick. The tool needs a clear source photo, a suitable replacement garment, and enough visual information to understand the model’s body and pose. You can start with EasyFaceSwap to explore the editing workflow and prepare your images.
Step 1: Prepare the Source Photo
Begin with the strongest product photo you already have. A front-facing or slightly angled pose usually works better than a side profile because the software can see more of the body area that needs editing. Make sure the model’s clothing is not hidden by arms, bags, long hair, or other objects.
Image quality matters more than many people expect. Use the original camera file if possible, rather than a compressed image downloaded from social media. The model should be in focus, the garment should be reasonably well lit, and the background should have enough contrast to separate the person from the surroundings.
Crop the image only if you need to remove distractions. Avoid cropping through the shoulders, waist, or garment edges unless the final image will be used in that same format. An aggressive crop can make it harder for the tool to understand where the new clothing should begin and end.
You’ll also need an image of the replacement outfit. A clean product image on a plain background is ideal, but it isn’t essential. The garment should be visible from an angle that makes sense for the model’s pose. For example, a front-facing shirt image is a poor match for a model turned sharply to the side.
Before uploading anything, check that you have permission to use both images. This is especially important when the model, clothing designer, photographer, or product owner is not part of your business.
Step 2: Upload the Images and Select the Garment
Open an AI Clothes Changer and upload the model photo as the main image. Then add the replacement garment image when the tool asks for it. Some editors let you describe the desired change in a text field, while others detect the clothing area automatically.
Use a direct instruction if a text prompt is available. “Replace the black sweater with the cream knit cardigan from the reference image” is more useful than “change the outfit.” Mention the specific garment you want changed and identify anything that must stay the same, such as the face, pose, hands, background, or jewelry.
Keep the first attempt simple. Replacing one main garment usually produces a more believable result than changing a shirt, trousers, shoes, scarf, and accessories at the same time. Once you have a good base image, you can make smaller edits separately.
The editing process may take a few seconds or several minutes, depending on the tool and image size. Do not judge the result only by the thumbnail. Open the full image and inspect the neckline, sleeves, waist, side seams, and areas near the hands.
Step 3: Check Fit, Shape, and Fabric Details
A believable outfit replacement has to follow the model’s body and pose. Look at the shoulder line first. If the new garment sits too high, too low, or at an odd angle, the entire edit will feel artificial even if the color and texture look accurate.
Next, inspect the areas where the garment overlaps the body. Sleeves should pass naturally behind or in front of the arms. A jacket should open in the right place. A shirt should meet the neck without leaving a strange gap or adding an unnatural collar.
Pay close attention to hands and hair. These areas often create editing problems because they overlap the clothing. If a hand is supposed to rest on a jacket pocket, the fingers should remain visible and the pocket should not appear on top of the hand. Long hair should also continue to cover the garment when it did so in the original photo.
Fabric behavior is another useful quality check. A fitted garment should not suddenly have loose folds, and a loose shirt should not look painted onto the body. Patterns should follow the garment’s shape rather than staying flat like a sticker.
Use this quick review as a practical guide:
| Area to inspect | What a good result should show | Warning sign |
|---|---|---|
| Neckline | Clean contact with the neck | Gaps, halos, or a floating collar |
| Shoulders | Shape follows the model’s pose | One shoulder looks wider or raised |
| Sleeves | Correct overlap with arms and hands | Arms appear pasted over the fabric |
| Waist and sides | Natural folds and body contours | Straight edges or melted seams |
| Pattern and texture | Print follows the garment shape | Pattern remains flat or distorted |
If the result is close but not quite right, try a cleaner reference garment or a less complex source pose before changing several settings at once. That makes it easier to understand what improved the image.
Step 4: Refine the Image for Product Use
After the outfit looks correct, compare the edit with your original photo. The model’s face, skin tone, hair, lighting, and background should remain consistent. If the editing tool has changed any of those areas, regenerate the image or use a separate retouching editor to repair them.
Color consistency deserves special attention. A cream garment can look white under bright studio lights and yellow under warm indoor lighting. If the replacement clothing does not match the scene’s light direction, it may look like it came from a different photograph.
You can make small corrections in a standard image editor after the AI edit. Adjust brightness, contrast, saturation, and sharpness carefully. Avoid heavy smoothing, since it can remove fabric texture and make the outfit look synthetic.
Keep the original and edited files together. Name them clearly so your team knows which version shows the actual photographed garment and which version uses a digital replacement. This is also helpful if a customer asks for a product image that accurately represents the item they will receive.
For online stores, export the final image in the dimensions required by the website. Check it on both desktop and mobile screens. Fine details that look acceptable on a large monitor may show obvious distortions when the image is reduced or viewed closely.
Tips and Common Mistakes
The most reliable edits begin with a compatible pose. A relaxed standing model with visible clothing is easier to edit than a model sitting behind a table or holding several items across the torso. If your existing photo is difficult, try another image from the same shoot instead of forcing the tool to work with it.
Avoid using a replacement image with a radically different viewpoint. A flat lay photo of a garment does not provide the same information as a garment photographed on a person. A clean mannequin or model image often gives the software a better sense of sleeve length, folds, and proportions.
Do not assume that a high-quality output is automatically an accurate product image. AI can invent buttons, pockets, seams, logos, and fabric patterns. Zoom in on branding and distinctive details, especially when the image will be used to sell an expensive or highly structured item.
It also helps to keep a human approval step in your workflow. A visual editor or product manager can spot problems that are easy to miss when you have looked at the same image repeatedly. Ask them to check the fit, product color, logo placement, and areas where the garment overlaps the body.
Finally, be transparent when the image could mislead shoppers. A digitally changed outfit should represent the real product closely, not create a design that does not exist. If the color, cut, material, or pattern differs from the item being sold, use the edit for concept work rather than as the final sales image.
Conclusion
Changing a model’s outfit without a reshoot works best when the original photo and replacement garment are visually compatible. Start with a clear pose, provide a strong garment reference, and change one main clothing item at a time. Then inspect the edit closely for fit, overlap, lighting, texture, and product accuracy.
The process can help you test new colorways, create seasonal campaign images, and update product pages when a full shoot is not practical. It still has limits, particularly with complicated poses, hidden garments, hands, hair, and fine details. Used with careful review, though, it can turn existing product photography into useful new content without putting the model and photographer back in the studio.